According to Evgeniï Trubetskoï, "the mysticism of icon painting is primarily solar, in that word’s highest spiritual sense. However beautiful the skys other colors may be the gold of midday sun remains the color of colors and the miracle of miracles."[1]
In icon painting this divine gold is used in a special way. It is gold hatching; a technique of creating fine lines in gold over painted areas of an icon painting. It never looks like solid gold; it resembles, rather, an unearthly, airy cobweb of fine rays emitted by God and lighting everything around. When it appears in an icon, God is always suggested as its source. However, in the presence of divine illumination gold hatching often glorifies also the part of the scene that has already entered divine life and is seen as touching it very closely. For instance, it covers the throne and the brilliant robe of the glorified Christ,[2] (fig. 1) and the mantle of the Virgin as she ascends to heaven. Angel wings and the tops of paradisiacal trees are often touched with it. In some icons, gold hatching appears on the pointed domes of churches, never covering them, but making them glitter with rays. The ethereal quality of the rays of gold give the surface of the icon the appearance of live, glowing, moving light.
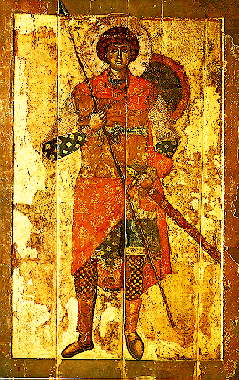
![]()
Fig. 1. Christ Enthroned in Glory by Andrei Rublev, 1400–1410, in the collection of the Tretyakov Gallery, Inv. No. 22124.
In general, gold hatching is used in icon painting with discretion. Gold hatching does not appear in icons where Christ’s humanity is stressed, where he "took upon him the form of a servant." But as soon as the artist sees Christ in glory, or wants to convey his imminent glorification, he introduces gold hatching.[3] Christ as infant often glows with it when the artist needs to emphasize the eternal nature of the Child. This fine gold covers the garments of Christ in icons of the Transfiguration, the Resurrection, and the Ascension. He shines with the same specific divine brilliance when he is shown leading human souls out of hell or in paradise with the thief.
The strongest impact is achieved by the use of gold hatching where the artist needs to contrast the spiritual world of the heavens to the material universe. We can see this, for instance, in ancient icons of the Dormition. For example in two sixteenth-century icons of the Dormition,[4] the Mother of God reclining on her deathbed, in her dark clothes, remains corporeally on this plane of being, the one we can touch and can see with our earthly eyes. But the figure of Christ in light raiment, standing behind the bed with the Virgins soul in the guise of an infant in his arms, is clearly a vision of heaven. The whole figure shines and shimmers, separated from the intentionally heavy earthly colors by the otherworldly weightlessness of gold lines.
Brief History of Gilding in Russian Icons
The are two basic techniques of applying gold hatching: one is to adhere small pieces of gold leaf, called skewings, and the other method is to paint gold finely ground in a binder, such as gum arabic, with a brush. Both techniques begin with gold leaf.
![]()
Fig. 2. Saint George, 12th century from the Cathedral of Saint George at the Yuriev Monastery in Novgorod. Egg tempera on Lime wood board overlaid with canvas, 2.30 X 1.42 m in the collection of the Tretyakov Gallery.
Gold and silver are forged into very thin leaves called "gold leaf" and "silver leaf." Until the last century, extremely thin sheets of gold and silver were forged by hand from annealed metals. For gilding, artists mostly use nearly pure gold, which is measured in karats—24 karats being pure gold. Gold leaf is available in many different tints—from greenish to reddish—depending on the amount of silver and copper admixtures. A higher gold content and/or greater amount of copper results in deeper tones of gold leaf. For example, 23 karat gold leaf is composed of 96% gold, 3% silver and 1% copper. The higher karat leaves are also more durable due to the higher gold content, which does not tarnish and oxidize. In the lower karats of leaf, such as 18, 16 and 12 karats, gold is alloyed with greater amounts of silver or other metals to achieve lighter colors.
In the earliest Russian icons, from about the tenth to fourteenth centuries, gold is of greenish tint because of its high content of silver. The gold leaf is also thicker than the gold leaf of icons of the fifteenth and sixteenth centuries. Such greenish gold can be seen in icons of the twelfth century George the Great Martyr, (fig. 2) shoulder-length Deisis, and on other icons up to the fourteenth century. After that period, gold leaf in Russian icons is thinner and has a bright yellow or reddish color, because it contains small amounts of copper. From the sixteenth century Russian icon painters began to use another type of gold leaf—dvoinik—two thin sheets of gold and silver forged together. The upper side of dvoinik is of gold while the lower side is silver.
Silver leaf was not used often in icon paintings. The earliest known example of easel painting using silver is in the halo of Saint Nicholas in the icon Saint Nicholas the Miracle-Worker from the Novodevichi Monastery in Moscow. This icon has been dated at the beginning of the thirteenth century, and is now located at the Tretyakov Gallery.
Imitations of silver using tin and of gold with copper are not often found in ancient icons. One notable example, however, is found in the icon of the Mother of God of Tolga from the beginning of the fourteenth century, now at the Tolga Monastery near Yaroslavl, which background was covered by sheets of tin instead of silver. Tin covered with a glaze of ochre oil paint or yellow varnish is frequently encountered in icons of the nineteenth and twentieth centuries.
The technique of applying gold hatching most often found in ancient Russian icons is by grinding gold leaf in a gum base. In ancient Russian art all paints were originally called tvoryoniye (from the word tvorit meaning "to grind"). Since the nineteenth century, however, only gold and silver paints were called tvoryoniye.
Materials Needed for Gold Paint
To prepare gold for painting it must be mixed with a binder—gum arabic and water—to make a thick, viscous fluid. For this procedure we shall need the following items:
The quantity of gold necessary to prepare one portion of gold paint is usually ten leaves. It is the most suitable portion for the grinding process to produce high-quality gold paint.
To prepare the gum arabic-water solution you will need approximately one part of water to an equal amount in volume of gum arabic. The actual proportions here is not critical, but what is vital is that the consistency of the gum-water solution should be like thick honey. In a double boiler, heat the water and stir in the gum arabic. Powdered gum takes less time to dissolve then lumps, but complete dissolution still requires about two to three days. After the solution cools, cover and leave it until the solution is clear and the gum completely dissolved. Strain the gum solution through cheesecloth into a clean jar. Keep refrigerated when not in use for it spoils easily. Never heat this solution over a direct flame or heating element, for it will scorch.
Procedure for Preparing Gold Paint
The following procedure demonstrates how to make water-based gold paint. Alternatively, you can purchase a similar form of gold paint, called "shell gold," from the Natural Pigments online store.
![]()
Fig. 1. Pour gum arabic solution into a saucer
![]()
Fig. 2. Stir the gum solution well
Pour the gum arabic solution into a clean saucer enough to cover a quarter (a U.S. coin about 2.5 cm or one inch in diameter) and stir it with your forefinger until it becomes a homogenous mass. The gum arabic solution must have the consistency of thick honey; if it is thinner the gold pieces will form into pellets.
![]()
Fig. 3. Pick up a leaf of gold
With the same finger pick up a sheet of gold leaf and drop it onto the gum arabic solution in the saucer.
![]()
Fig. 4. Break up the leaf into small pieces
Break the gold leaf into smaller pieces by raising and pressing your finger repeatedly onto the leaf until the gold is mixed into the solution. Use only the vertical motion of your finger to mix the gold. Avoid rubbing the gold with a horizontal movement, otherwise it may roll into pellets and become difficult to grind. Pick up and pulverize the remaining nine leaves of gold in exactly the same manner.
![]()
Fig. 5. Grind the gold into fine particles
![]()
Fig. 6. Add a few drops of water, if needed
Now you are ready to begin grinding the gold into fine particles. With the same finger grind the gold particles in the solution with a clockwise and counterclockwise motion. Applying pressure with your fingertip, grind the gold for thirty minutes. The gold will become fine particles only if the mixture has a thick consistency. If you feel that the mixture is too dry, add a drop or more of water from the glass with your fingertip.
![]()
Fig. 7. Add more gum arabic solution
When you can see and feel with your finger that the gold is ground into fine particles, the process of grinding is finished. Now you can make gold paint. For this add a little more gum arabic solution than was used at the beginning. Mix the gum arabic solution with ground gold for another fifteen to twenty minutes to make a uniform mass.
![]()
Fig. 8. Add water to the saucer
![]()
Fig. 9. Mix the ground gold well with the water
We have mixed gold with gum arabic, but it is not yet paint. Now for the gold to glitter after it is burnished it is necessary to remove the excess gum arabic. To do this fill the three fourths of the saucer with water and carefully mix it with the ground gold. Afterwards let it stand for an hour. The gold particles will settle to the bottom of the saucer. Pour off the remaining clear water. Allow the gold to dry under a lamp.
The dried gold is now ready to be applied to your painting. During the entire process it is important to keep the gold free from dust particles.
Inexperienced artists may find it difficult to prepare gold paint at first. They may apply it and find that it rubs off easily, or does not shine after it has been burnished. There are several reasons for such failure. The first reason is that not enough gum arabic was used in the final paint, which will cause the gold to rub off after it is dried. Another reason is that too much gum arabic was added—gold particles are surrounded by excessive gum and will not glitter. Even after burnishing it may appear a dull yellowish brown color. A third reason is that the gold was not ground finely enough to make delicate fine lines in the painting.
Applying the Gold Paint
To apply and finish the gold paint you will need the following materials:
Materials Needed
![]()
Fig. 10. Load the brush with gold paint
![]()
Fig. 11. Load the brush with gold paint
See the detail of the icon Christ in Glory for a model of how to gold paint on clothing.
Load the brush with water and squeeze out the excess on the edge of the cup. Pick up gold paint with the brush by dragging it across the surface of the dried gold paint. Apply the paint in thin smooth brushstrokes to the highlight areas on clothing, called silki in Russian.
To model volume in the clothing paint thin lines from silki, thick at the beginning and thin at the ends.
![]()
Fig. 12. "Feather" highlights brush strokes on the cloak of the Mother of God
![]()
Fig. 13. The method of brushing with gold paint
For painting gold highlights on the cloak of the Mother of God, a method called "feather highlights" is used. Thin lines are painted from silki in pairs and the space between them is filled with a more transparent layer of gold.
![]()
Fig. 14. "Inokop" method of painting
Another method of painting is called inokop in Russian. These are thin delicate lines painted nearly parallel to one another from the silki.
![]()
Fig. 15. Burnishing the gold hatching
Once you have completed painting the gold, you will notice that it does not gleam like gold, but appears rather dull. To make the gold shine you must burnish it. Take the Agate burnisher and rub the gold using moderate pressure, but not too much so as to rub off the gold. After burnishing the gold begins to gleam.
![]()
Fig. 16. Detail of the finished icon with gold
Chapter 1. The Mixture of Pigments for Nude Bodies
The pigment called flesh-color, with which faces and nude bodies are painted, is prepared thus. Take ceruse (i.e., the white which is made from lead) and put it without grinding, just as it is, dry, into a copper or iron pot; set it on blazing coals and burn it until it becomes yellowish-tan color. Then grind it and mix white ceruse and cinnabar with it until it looks like flesh. Mix these pigments to suit your fancy; for example, if you want to have red faces, add more cinnabar; if white, put in more white; if pallid, put in a little prasinus (8) instead of cinnabar.
Chapter 2. The Pigment Prasinus
This prasinus is, as it were, a special preparation with a resemblance to green and black. Its nature is such that it is not ground on a stone, but when it is put into water, it disintegrates and it is then strained carefully through a cloth. It is very serviceable for use as green on a new wall.
Chapter 3. The First Shadow Pigment
When you have mixed the flesh-color pigment and have laid in the faces and nude bodies with it, mix with it prasinus, the red that is burnt from ochre, and a little cinnabar, and so make shadow pigment. With this you should delineate the eyebrows and eyes, the nostrils and mouth, the chin, the hollows round the nostrils, the temples, the wrinkles on the forehead and neck, the roundness of the face, the beards of young men, the fingers and toes, and all the distinctive limbs of the nude body.
Chapter 4. The First Rose Pigment
Then mix a little cinnabar and a little less minium (9) with the plain flesh-color pigment, to make the pigment that is called rose. With this redden both cheeks, the mouth, the lower part of the chin, the neck and the wrinkles of the forehead slightly; also each side of the forehead above the temples, the length of the nose, above the nostrils on each side, the fingers and toes, and other limbs of the nude body.
Chapter 5. The First Highlighting Pigment
After this mix ground ceruse with the plain flesh-color pigment and prepare this pigment which is called the highlighting pigment. With this paint highlights on the eyebrows, the length of the nose, and above the opening of the nostrils on each side, the fine lines round the eyes, the lower part of the temples, the upper part of the chin, close to the nostrils, each side of the mouth, the upper part of the forehead, slightly between the wrinkles of the forehead, the middle of the neck, around the ears, the outside of the fingers and toes, and the middle of all the roundnesses of the hands, feet, and arms.
Chapter 6. Veneda, To Be Put on the Eyes
Then mix black with a little white (10). This pigment is called veneda. Lay in the pupils of the eyes with it. Add still more white to it, and lay in each side of the eyes. Paint plain white between the pupil and [the areas covered by] this pigment, and wash it with water.
Chapter 7. The Second Shadow Pigment
Next, take the above-mentioned shadow pigment and mix more prasinus and red with it to make a darker shade of the former pigment. Lay in the intermediate space between the eyebrows and the eyes and in the center below the eyes, close to the nose, between the mouth and chin, the down or slight beards of adolescents, the half of the palms facing the thumb, the feet above the smaller toes, and the faces of boys and women from the chin up to the temples.
Chapter 8. The Second Rose Pigment
Then mix cinnabar with rose, and with it paint along in the middle of mouth so that the former [rose] shows above and below. Draw fine lines over the former rose on the face, neck, and forehead. Delineate with it the lines in the palms, the joints of all the limbs, and the nails.
Chapter 9. The Second Highlighting Pigment
If the face turns out to be dark so that one coat of highlighting pigment is not sufficient, add more white to it and draw fine lines with it all over the first highlights.
Chapters 10, 11, 12. (About painting hair and beards—Author's note)
Chapter 13. Exudra and Other Pigments for Faces
Then mix a little black with red to give a pigment called exudra, and with it draw the lines round the pupils of the eyes and along in the middle mouth and make fine lines between the mouth and the chin. After this make the eyebrows with plain red and draw fine lines between the eyes and the eyebrows, below the eyes, and on the right side of the nose when in full face; also paint above the nostrils on each side, below the mouth, round the forehead, inside the cheeks of old men, round the fingers of the hands and inside the toes of the feet, and in front round the nostrils when the face is in profile. On the eyebrows of old and senile men you should use the veneda with which you laid in the pupils. Use plain black for the eyebrows of young men (in such a way that a little red shows through above [the eyebrows]), also for the upper part of the eyes (in the eyelashes), the holes of the nostrils, each side of the mouth, around the ears, the outside of the hands and the fingers, and for the toes and the other lines of the body. Draw all the lines round the nude bodies with red, and delineate the nails with rose pigment from the outside.
Sankir in Eastern Christian Painting of the 9th through the 13th Centuries
Usually, the process of constructing painted faces in Eastern Christian painting of the 9th through the 13th centuries is reduced to the following steps:
Step 1: Draw the cartoon and grafi (18) on the ground (19).
Step 2: Paint an overall tone of flesh color (20) throughout all areas of the face and body parts over the cartoon on the ground. This tone is sufficiently bright (21), and therefore reduces the need for prolonged modeling with a highlighting tone, which forms the widest areas of the face. (22)
Step 3: Apply a reddish-brown pigment, darker than the proplasmos (sankir), and consisting basically of red ochre, prasinus [Editors note: For a thorough discussion about this color see the previous article.] and cinnabar, in a thin transparent coat on the primary shadows: in the eye sockets, along the shaded sides of the nose, mouth, chin, on the folds of the forehead and the neck, on the outline of the face, and so forth. (On the faces of young people the wide shadows are fairly often painted with warm green earth pigment, such as warm glauconite).
Step 4: Paint the outline of the cartoon — eyes, eyebrows, shaded side of the nose, face, hair, etc. — in black mixed with a small amount of whiting and cinnabar (veneda, i.e., a brownish color — see chapter six of the first book, "The Art of the Painter," in On Divers Arts by Theophilus).
Step 5: Take some cinnabar, mix it with a small amount of a light proplasmos tone and outline the lips, the shape of the nose on the shaded side, and with very dilute color, paint thin glazes on the rouge of the cheeks, forehead, neck, hands and legs.
Step 6 (last step): Take almost pure whiting and add a small amount of the dominate color or a small amount of cinnabar, orpiment and dark-blue (lazurite, azurite or black) and complete the modeling and the whites of the eyes.
![]()
Click here to view larger image
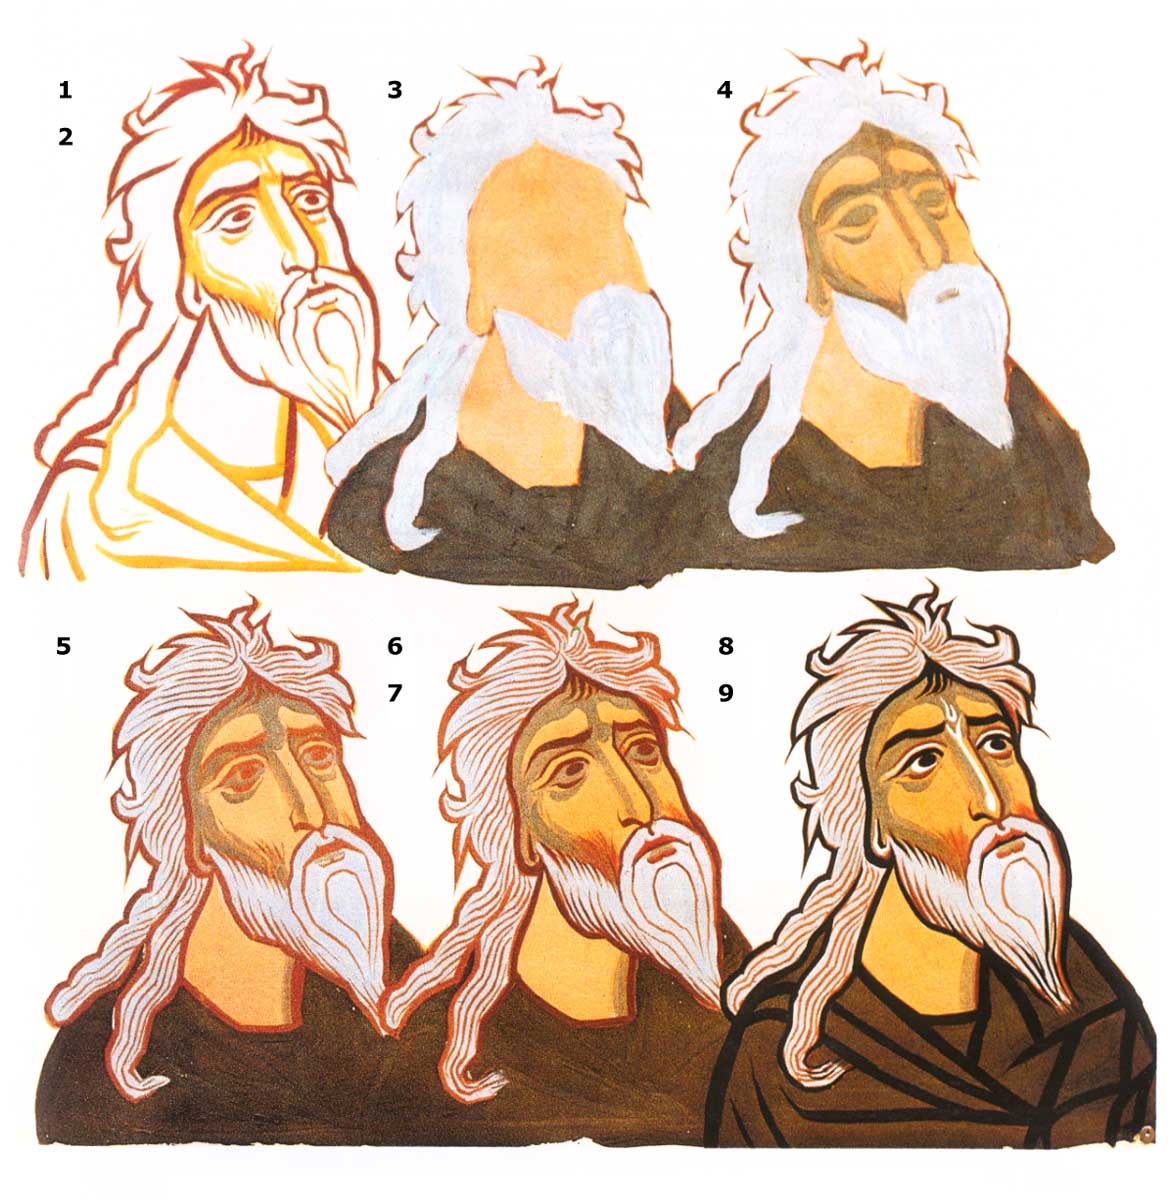
Fig. 1. Succession of steps (1–9) in the painting of faces of the 11th century fresco of Ateni Sion.
This process was at first more complex between the 6th and 8th centuries among the different schools, and then was later simplified. The 11th century wall painting from the western apse of the Church of the Dormition of the Mother of God at Ateni Sion (Fig. 1) serves as an example of this simplified painting process:
1. Draw the cartoon with gold ochre on the plaster.
2. Refine the cartoon with red ochre.
3. Paint the overall tone of proplasmos (sankir).
4. Apply paint to the shaded areas.
5. Reinstate the outline and details of the cartoon (first layer).
6, 7. Further reinstate the figure, deepening the tonal value of the shaded areas (second layer) and applying rouge to the cheeks.
8, 9. Add darker tones to the shaded areas (third layer) and paint the final highlights.
An example of a more complex painting method can be seen in the 12th century fresco of Saint George Cathedral in Old Ladoga, where shadows and highlights were done in two or three steps, beginning with thin transparent glazes that make a smooth passage to the opaque underpainting. Sometimes the color of the first shadows is altered, for example, in color that is applied to the light underpainting of sankir-proplasmos as the very first modeling of volume instead of thin glazes, and therefore provides a light brown modeling. This modeling is applied with an olive or green pigment only after the outlining of eyes, nose, lips, face, etc. is done with a brown pigment (23).
The system described above remained in use as a standard with only small deviations over a long period until the 13th century. Especially was it used in frescoes, such as the 13th century wall paintings of Saint George Cathedral in Achi, and in large icons where the dimensions of faces now and then exceeded the sizes of faces in monumental painting.
However, by the 11th century we find in small icons two systems being used within one work, for example in the icon of the 11th and 12th centuries Saint John Climacus (24) from the Monastery of Saint Catherine on Mount Sinai. The first system is the same described by Theophilus but considerably simplified because of the small sizes of the faces; and the second, is modeled highlights on wide areas of the faces of angels painted over an even-toned light green underpainting. (In this case, apparently the method is used for the purpose of isolating the pale angelic faces.) Although it is widely known that the modernized methods generally occur earlier in book miniatures and miniature icon paintings than in monumental paintings, green underpainting (sankir) of comparatively bright tone, although extremely rare, is encountered both in monumental and large-format easel painting as early as the 12th century, such as in the frescoes of Saint Demetrius Cathedral in Vladimir (25) and in the monumental icon of Saint Demetrius of Thessalonica in the collection of the State Tretyakov Gallery, Moscow (26). In these examples, it is feasible to conclude that the masters turned to methods found in the miniature painting developed by iconographers at the Monastery of Saint Catherine.
Besides the cited examples, the green underpainting is usually found only in miniature painting, such as several miniatures in the Trebizond Gospel of the 10th century. Here it is most noticeable in the miniature of the Evangelist Saint Mark (27) and is used to convey the darkness of his face. In the icons of the Descent of the Holy Spirit (Pentecost) and Descent into Hades of the 12th century from the collection of the Hermitage, Saint Petersburg (28), green sankir is placed "selectively." Namely, in the Descent into Hades it is located only on the face of Christ and the dark-complexioned face of John the Forerunner. The same method is found in miniatures of the Galitsko-Volinskom Apocryphal Gospel of the end of the 12th century. Here Mark and Luke are depicted swarthy and dark-haired on a dense green underpainting (sankir), and Matthew and John are white-haired and pale-faced old men on a light tone underpainting (29). Still more graphical in this sense is the Gospel of Nicodemus of the 13th century. The faces of all its miniatures are painted in the old manner (i.e., over an underpainting of flesh color and green added only to very small areas of shadows). Only the pale face of the raised Lazarus in the miniature of the Resurrection of Lazarus, and the dark-complexioned face of the Forerunner in the miniature Christ and the Forerunner are done on a green underpainting.
There are enough examples to make it possible for us to deduce that green underpainting in miniatures of the 10th through 13th centuries was an extremely rare painterly method used to convey the appearance and state of a character, but generally not a common method for painting faces. Typically, almost all paintings in Eastern Christian countries of the 11th through the first half of the 13th centuries still used flesh color as the underpainting in respect to the shadows and modeled highlighting. However, beginning from the second half of the 13th century, in many instances there appeared deviations from the previous standards — a combination of methods from both old and new systems within the scope of one work. Let us consider the steps in painting faces, for example, in the frescoes of the 12th century Saint George Cathedral in Old Ladoga — made in the old, classical manner of the 11th to 12th centuries — and the painting of faces in the frescoes of the 13th century church of Saint George in the settlement of lower Achi in Western Georgia.
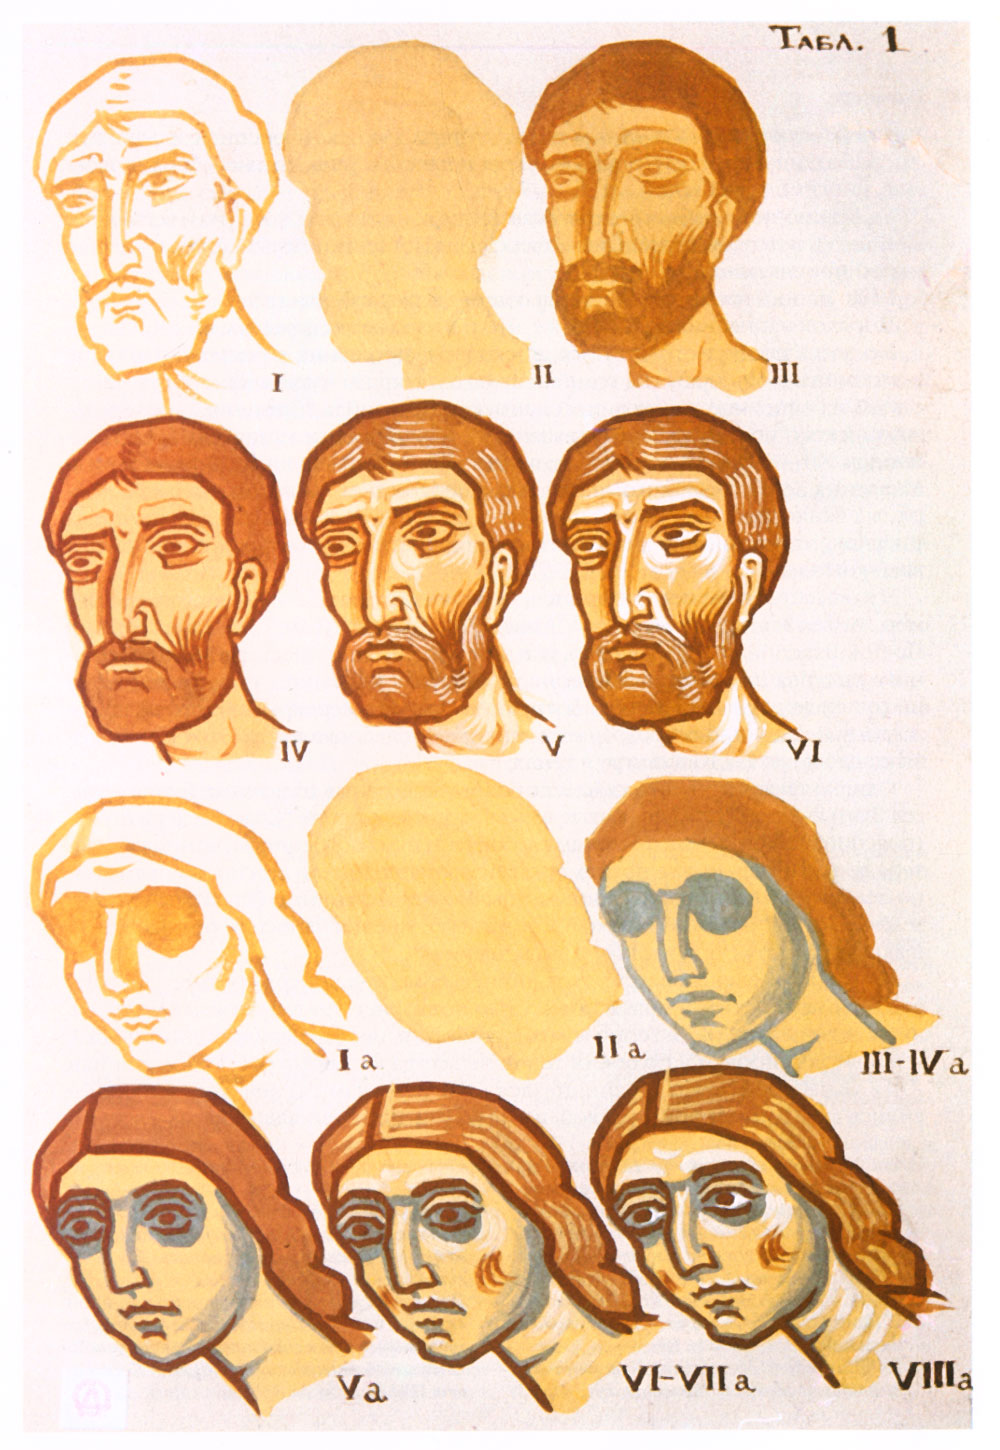
The sequence of painting in Old Ladoga (Fig. 2, 1–6) follows:
1. The preliminary figure of the face is drawn with deep gold ochre on the white ground.
2. Proplasmos-sankir of a light tone ochre, close in color and tone to the ochre of a halo, is painted within and overlapping the preliminary figure.
3. Diluted, transparent reddish-brown pigment is used to outline in light brushstrokes the face and to slightly add shaded form to the shadow side of the nose, upper and lower eyelids, neck and shadows around the eyes. Shadows are kept small in area, and therefore the bright ocher underpainting of the face remains quite visible.
4. Using the same reddish-brown pigment only opaque and thicker, make one clean line to draw the eyebrows, eyelids, and pupils of the eyes, nose, mouth and all contours of the face.
5. With diluted white pigment (mixed with a small amount of the proplasmos-sankir color) model the forms of the forehead, above the eyebrows, nose, cheeks, neck, etc.
6. With lines thinner than the foregoing white highlighting, and using thick, almost pure white paint (thick enough so that in oblique lighting the highlights would appear almost sculptural in relief) complete the painting of the face.
![]()
Click here to view larger image
Fig. 2. Succession of steps of painting faces from the 12th century frescoes in Old Ladoga (Steps I-VI) and the 13th century frescoes from the Church of Saint George in the lower region of Achi (Steps Ia-VIIIa).
Hair is usually painted as follows: In old people lay an underpainting of verdure (made with white and glauconite (30)) on the head and beard and, using white mixed with a small amount of the underpaint, apply strokes for the strands of hair; in middle-aged people (for example, the prophet Jeremiah) the underpainting for the hair is composed of reft (Translators note: carbon black or bone black) and white (i.e., a gray color); in younger people the underpainting for the hair is made with a thin reddish-brown pigment.
All faces in the church of Old Ladoga are painted in this manner, and only on the hands, legs, outline of jaws, and neck muscles of certain figures in the Apostolic and Angelic ranks and in the cupola composition of the Ascension of Christ are found visible brushstrokes of bright green.
In the Achi frescoes of the 13th century, the majority of faces are painted with the same — although simpler – system that was described for the Old Ladoga frescoes: Light gold ochre, same as on haloes, in the underpainting (proplasmos), reddish-brown outlines and small areas of highlighting (31). Green is not used in this system of painting at all. Nevertheless, many of the large-sized faces (Christ, Mother of God, and John the Forerunner), faces of young people, and female faces in the compositions (32) are done with green shadows as follows (Fig. 2, 1a–8a):
1. With ochre outline the preliminary figure of the face on the white ground (corrections of the figure are made with red ochre).
2. Use light gold ochre of the same color as halos to lay an underpainting (sankir) over the entire silhouette of the head.
3, 4. Using paint well saturated with green pigment (33) (as the overall tone) develop in comparatively wide areas the shadows of the face: eye sockets, outline of the nose, contours of the jaw, mouth and the volume of the neck. The masters of the Achi wall paintings used this technique differently: Some without this shading in the shadows, others with this shading, and sometimes using hatched brushstrokes.
5, 6. Use reddish-brown pigment to outline the eyes, nose, mouth and the entire face.
7. Apply the first layer of highlighting (white pigment mixed with the proplasmos ochre).
8. With fine highlight lines complete the facial form and whites of the eyes.
The steps in painting hair are the same as in the Ladoga frescoes.
One thing should be mentioned here: The simplification of painting method and the arrangement of the composition generally is compensated by the fine judgment of the colorist. Thus, in one of the basic compositions of the Achi wall paintings, the Presentation of Jesus in the Temple, the master of foreign origin influenced by Cappadocian painting traditions of the 12th and 13th centuries (34), painted green shadows only on the faces of the Mother of God and the infant Christ, whereas the faces of other subjects are painted onto the brown outlined figure using a light ochre sankir with a small amount of green added only to harmonize their painting with the coloring of the entire composition.
As far as methods of icon painting are concerned, in such icons of the 12th and 13th centuries as the Angel of the Golden Hair of the 11th century (35), Savior of the Golden Hair of the 13th century, (36) and the Saints George, John and Blaise (37), the master not only drew the outlines of the preliminary figure on the levkas using a thinned black pigment, but also developed the shadows, and then overlapped these with an overall tone of transparent flesh color sankir. This method creates a complex color play in the shadows.
However, this system of painting is even more complicated in the icons titled Angel of the Golden Hair, Savior of the Golden Hair, and also in the 13th century icon of the Savior the Almighty (waist-length) (38). In the deepest shadows of these icons (especially in the eye sockets) the masters made hatch brushstrokes of a dark green color over the proplasmos, typically composed of glauconite, birch wood carbon and brown earth (goethite). And only after this did they finish the dark figure by adding rouge and highlights (39).
Putting green glazes in shadow areas over the solid tone of sankir-proplasmos almost exactly repeats the painting technique of young persons with green shadows in the church of Saint George in Achi. True, added green glazes in deep shadows do not always exist in Russian painting of the 13th century. Often these masters were limited to modeling shadows by building a translucent tone with dilute black pigment on the light sankir and levkas, as is evident in three Novgorod icons of the 13th century: Saint Nicholas (waist-length with selected saints in the borders and background) (40), Savior Enthroned (with selected saints in the borders) (41), Saints George, John and Blaise (42); and two Pskov icons of the 13th century, Prophet Elijah in the Desert (with scenes from his life and Deisis) (43) and the Assumption (from Paromeniy) (44). Although belonging to different schools, and being different in their painting complexity and degrees of craftsmanship all these icons nevertheless are similar according to the principle of defining shadows and highlights on flesh color sankir.